Arduino IoT Cloud
Arduino IoT Cloud
Connect the cloud to the world around you.
Arduino IoT Cloud is a powerful service, allowing anyone to create IoT applications with just a few simple steps. With a combination of smart technology, user-friendly interfaces, and powerful features, our cloud is for everyone: students, makers, professionals alike.
A walk through the Arduino IoT Cloud
The Arduino IoT Cloud is designed to help people create great things with ease. It is as simple as connecting a device, creating variables and a dashboard to monitor it. Whenever we create a Thing, a sketch is automatically generated, and updates with all changes we make in the cloud!

Based on what you want to achieve, an IoT application will require a few basic components:
- Devices to collect data or control something;
- Software to define the behavior of the hardware (e.g., Arduino Sketch);
- Cloud application to store data, or remotely control the equipment.
But let's take a look at some essentials of the Arduino IoT cloud!
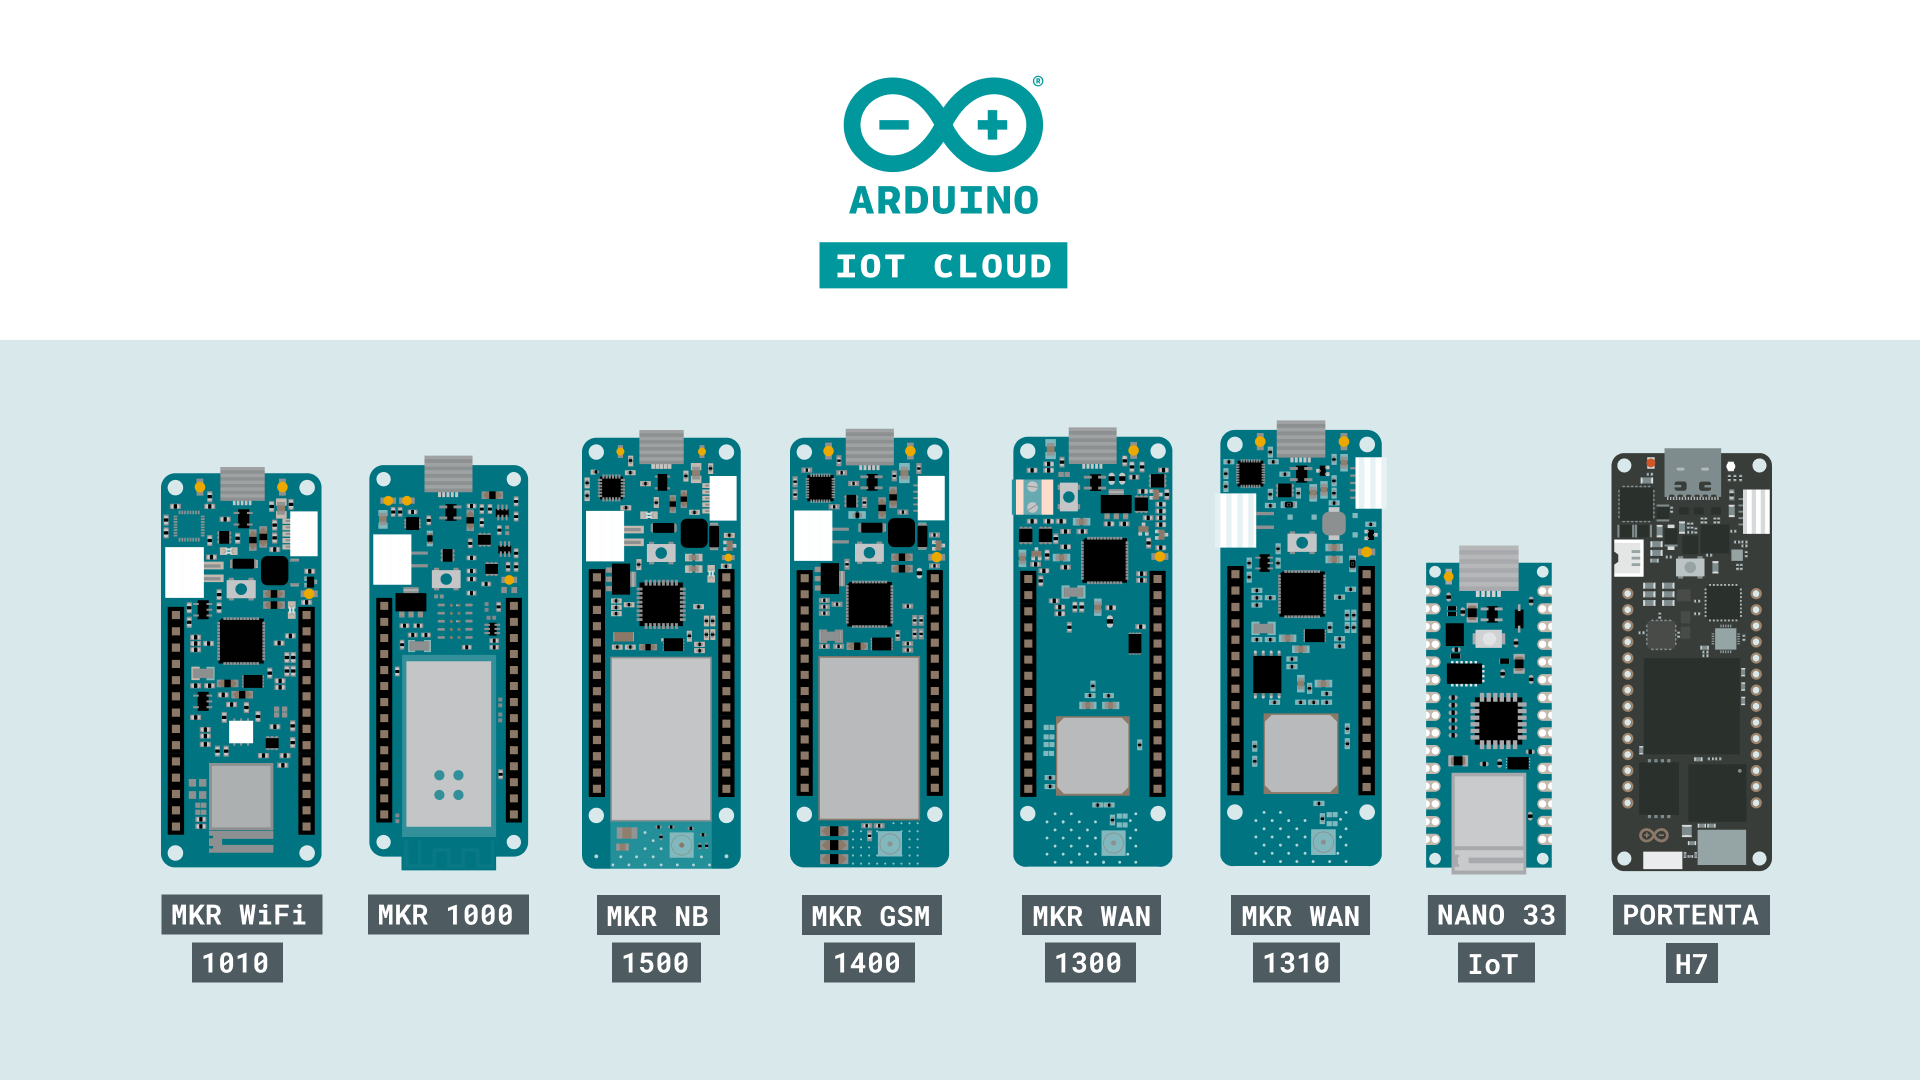
Devices
Devices are physical objects like a hardware board that can be contained inside a product (e.g., MKR WiFi 1010). They’re the hardware that runs the software, reads sensors, controls actuators and communicates with the Arduino IoT Cloud.
Take a look at the Arduino boards that are compatible with the cloud:
There's also a selection of popular third party boards that are compatible with the cloud. You can find out more about this in the Manager for Linux devices.
Things
Things are the digital twin of our hardware. When we create a new Thing, there are a few configurations that we need to do to get started.
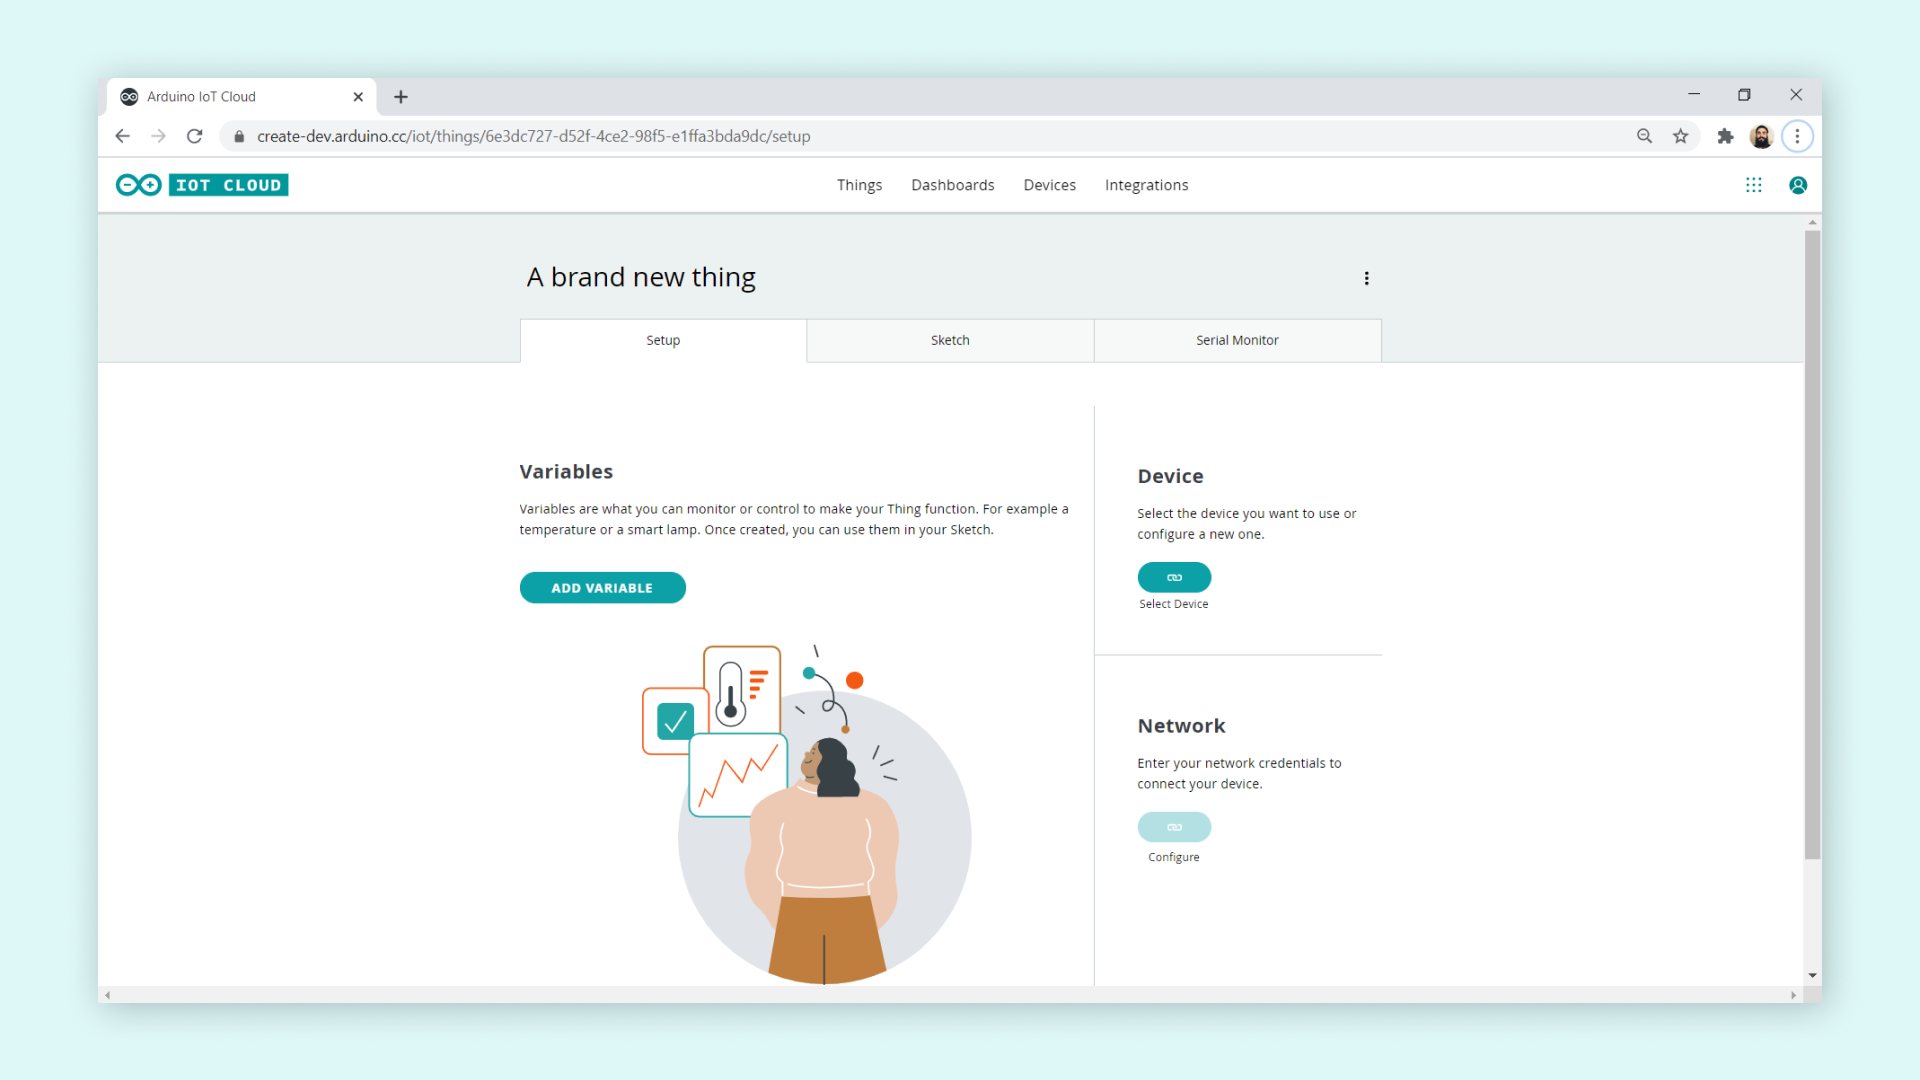
- Link a device - the first thing we need to do is to link a device to our Thing. To do this, we can choose between configuring a new device, or selecting a device that we already configured.
- Select a network - here we simply enter the credentials to the network we want to connect to.
- Create variables - choose a data type, update frequency, and give it a good name!
All of the configurations we make here are automatically generated into a sketch file. This means we don't have to enter any special tokens or passwords in the sketch at all, and we can start using the variables we create in the cloud straight in the code.
Variables
Variables are the qualities defining the characteristics of a system. A variable can be something like a 'read-only' (RO) setting to indicate the Arduino IoT Cloud can read the data, but cannot change the value of the variable. A variable might be designed as 'read and write' (RW) if the Arduino IoT Cloud can also remotely change the variable's value and send an event notification to the device. This can be configured by either selecting the Interaction option to ON or OFF inside the variable configuration.
For example, let's say we want to create a device that: can read a sensor, turn on or off something, and write an analog value to. The below table shows the needed information to create these variables.
| Variable | Type | Value Range | Permission |
| dimmer | int | 0 - 255 | Interaction: ON |
| sensor_data | int | 0 - 1023 | Interaction: OFF |
| power_switch | BOOLEAN | n/a | Interaction: ON |
Creating a variable is super-easy, all we have to do is:
- Name it,
- Select a data type,
- Set value range,
- Choose permission, and..
- Click the ADD button!
And this is how it looks like in the variable list once they have been created:

Sketch and Serial Monitor tabs
As mentioned previously, all the configurations we make are generated into a sketch. With our most recent update, we have also included the Web Editor and Serial Monitor directly in the Arduino IoT Cloud.

If we want to edit the sketch after a configuration, simply click on the Sketch tab to begin. Here you can also verify and upload your code. You can still edit your sketches in the Web Editor, and there's a link here that will take you there!
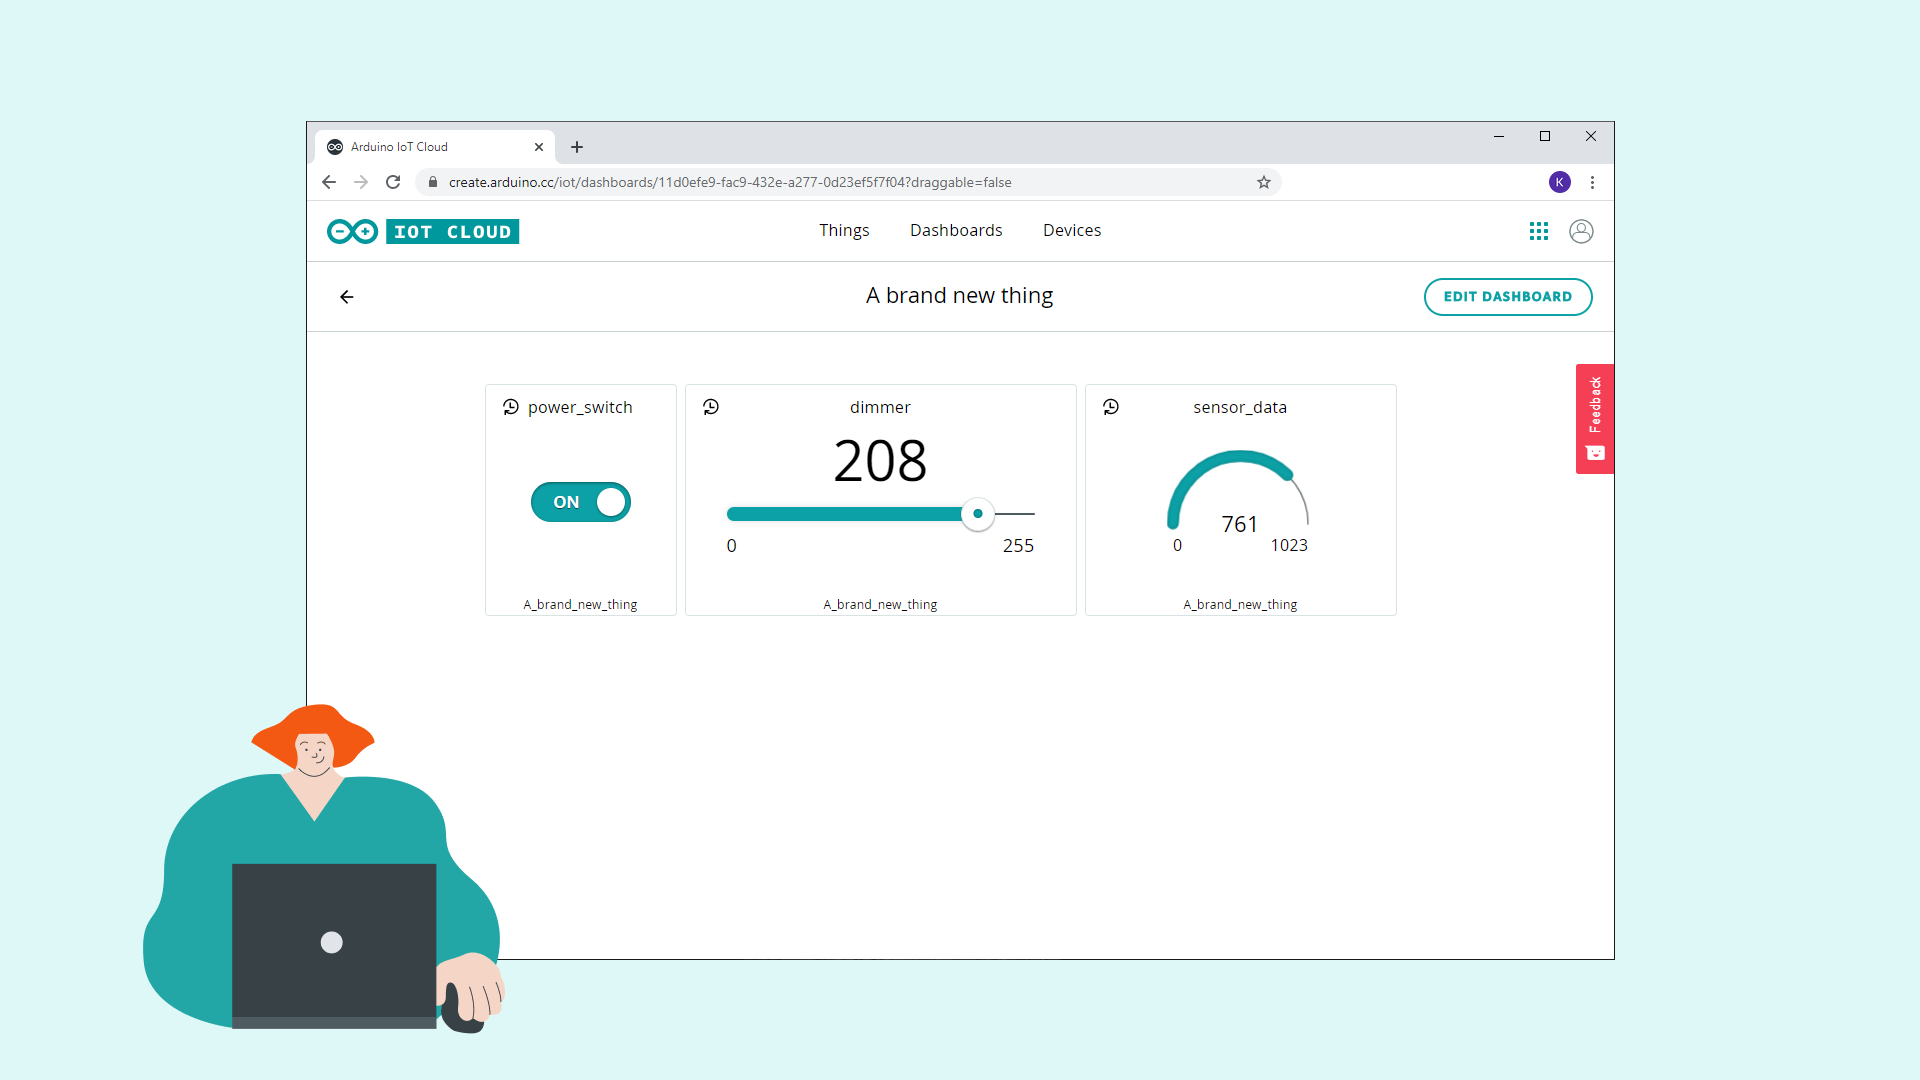
Dashboards and widgets
Dashboards are the center of attention in the cloud! It is here we build our very own control panels to monitor and control our devices. We can build a unique dashboard for a unique thing, but we also have the possibility of monitoring several different things in the same dashboard. If we for example have five active devices, each linked to a thing, we can create one dashboard to rule them all!
But what is probably most valuable inside the dashboards are the different widgets that we create. There are over 15 different widgets that we can use to represent the variables we create. Here, we can choose from gauges, switches, RGB controls, maps, sliders and much more, to create powerful dashboards.
Take at a look at this dashboard. The widgets are directly linked to the variables mentioned earlier.
Arduino IoT Cloud Events
The Arduino IoT Cloud becomes aware of events when it receives application messages that indicate something has happened. For example, it might be informed by a face-recognition application that someone is at a door, or it has received a request from another app that light has to be turned on.
Software for Arduino IoT Cloud
Arduino boards usually require you to program them, to enter some code by way of an Arduino Sketch. The Arduino IoT Cloud will quickly and automatically generate a Sketch when setting up a new thing: this is one of its convenient features.
Take a look at the example below to see a sketch that was automatically generated from setting up the IoT Cloud:
Arduino IoT Cloud allows other methods of interaction, including HTTP REST API, MQTT, Command-Line Tools, JavaScript, and Websockets. It’s a very versatile system. For more details, check out the API documentation.
Security
We at Arduino take cyber-security very seriously. All of our cloud-compatible boards come with the ECC-508 crypto-chip, ensuring that all data transferred and stored in the cloud are secure. We do however support some third party boards that are not equipped with the ECC-508 crypto chip.
Tutorials and Articles
You can find a lot more inspiration to get started with the cloud in the articles below:
1 comment